

So today around noon or so I'll be picking my new rear wheel bearing from the dealership to replace the one that the curb ate. I will be posting a guide for those not wanting to pay ridiculous installation prices also ") this post is a placeholder for it obviously lol
this post is a placeholder for it obviously lol
-------------------------------------------------------------
Hub/bearing replacement guide! Difficulty - 5/10
Tools required:
H5 Allen key
H8 Allen socket
14mm socket
1-1/4" socket
Jack & Jackstand
Lug bolt tool
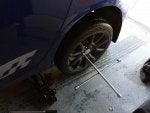
Step 1:
Jack car and place stand to where wheel is off the ground (pretend I have a jackstand installed...)
![]()
Then remove the 5 lug bolts holding wheel on.
Step 2:
Remove the 2 14mm bolts holding the caliper in place and move caliper off to the side. Additionally, remove the 2 brake pads (be careful to save the 2 metal seperation springs as well or risk dragging brakes)
![]()
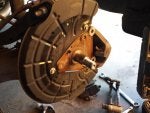
Step 3:
Remove the 2 H8 Allen head bolts holding the caliper bracket on, remove bracket. (don't worry about the washers, they're non-removable)
![]()
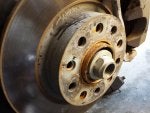
Step 4:
Remove H5 allen head screw from brake rotor, remove rotor. (If rotor will not seperate, it can come off with hub, and then seperated with force)
![]()
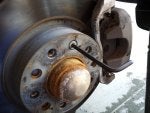
Step 5:
Remove axle nut dust cap with prying tools and a hammer (be careful not to damage rotor or dust cap, you will need it later)
![]()
Step 6:
Remove Axle 1-1/4" Axle nut (will come off with washer, does not seperate)
![]()
Step 7:
Remove hub and bearing assembly.
![]()
Step 8:
This step begins reassembly. Install replacement hub and bearing assembly, install axle-nut, then the rotor and it's screw, then the caliper bracket, then the brake pads (WITH SPRINGS) wear indicator side up, then install the caliper, (make sure everything is PROPERLY torqued down) (i'm unsure of proper torque settings, hoping someone can shed light on this) Guten tight... anyways... Then install your wheel and use a star pattern to tighten lug bolts. Lower your car and take it for a test drive. I suggest driving slow first, test the brakes, drive over speedbumps or potholes, then after you're content with that, drive more spiritedly, taking harder turns and maybe some zig-zaging.
And that's it! You've replaced something that you shouldn't have replaced until MUCH later, but you were driving on ice and slammed the rim sideways into a curb and smashed the bearings... Be easy on this guide, 6 hours of hell, finding the right sizes and order of removal, and alot of money spent on tools went into making this guide. But I'll be damned if it's not the first ON THE INTARWEBZ!!!
Enjoy peoples!
Corey S.
this post is a placeholder for it obviously lol-------------------------------------------------------------
Hub/bearing replacement guide! Difficulty - 5/10
Tools required:
H5 Allen key
H8 Allen socket
14mm socket
1-1/4" socket
Jack & Jackstand
Lug bolt tool
Step 1:
Jack car and place stand to where wheel is off the ground (pretend I have a jackstand installed...)
Then remove the 5 lug bolts holding wheel on.
Step 2:
Remove the 2 14mm bolts holding the caliper in place and move caliper off to the side. Additionally, remove the 2 brake pads (be careful to save the 2 metal seperation springs as well or risk dragging brakes)

Step 3:
Remove the 2 H8 Allen head bolts holding the caliper bracket on, remove bracket. (don't worry about the washers, they're non-removable)

Step 4:
Remove H5 allen head screw from brake rotor, remove rotor. (If rotor will not seperate, it can come off with hub, and then seperated with force)
Step 5:
Remove axle nut dust cap with prying tools and a hammer (be careful not to damage rotor or dust cap, you will need it later)

Step 6:
Remove Axle 1-1/4" Axle nut (will come off with washer, does not seperate)
Step 7:
Remove hub and bearing assembly.
Step 8:
This step begins reassembly. Install replacement hub and bearing assembly, install axle-nut, then the rotor and it's screw, then the caliper bracket, then the brake pads (WITH SPRINGS) wear indicator side up, then install the caliper, (make sure everything is PROPERLY torqued down) (i'm unsure of proper torque settings, hoping someone can shed light on this) Guten tight... anyways... Then install your wheel and use a star pattern to tighten lug bolts. Lower your car and take it for a test drive. I suggest driving slow first, test the brakes, drive over speedbumps or potholes, then after you're content with that, drive more spiritedly, taking harder turns and maybe some zig-zaging.
And that's it! You've replaced something that you shouldn't have replaced until MUCH later, but you were driving on ice and slammed the rim sideways into a curb and smashed the bearings... Be easy on this guide, 6 hours of hell, finding the right sizes and order of removal, and alot of money spent on tools went into making this guide. But I'll be damned if it's not the first ON THE INTARWEBZ!!!
Enjoy peoples!
Corey S.


