

LINK: http://www.xenonvisionhid.com/
Part 1
I will first off by stating this actually won't be going in my car. More of my friends dart due to me having stock D3S HIDs in my new dart. That doesn't mean I cannot keep a good eye on them after install, and be able to get tons of pics! So the package came in the mail today. Typical 2 day USPS shipping, which is amazing for companies. Try ordering from DDM Tuning (another HID company) and see how long your package takes. Considering it comes straight from China, literally. The packaging was great. I probably don't need to review these things, but if you've seen how some companies pack their crap (*cough* DDM *cough*) and considering that there are expensive electronics and fragile bulbs inside, its a good note to take.
 Spoiler: Part 1 Wall of Pics
![]()
![]()
![]()
Overall packing was fantastic. Only thing I could recommend differently is the casing around the bulbs. I noticed mine were loose/not around the bulb base entirely when I opened it. While the bulbs themselves are inside Styrofoam, I think something could be added to keep the plastic casing entirely on the bulb unless taken off by the customer. The locking fins on the base of the bulb do a okay job at holding it, but I have seen others also place like a Styrofoam ring around the base too to keep that casing entirely stuck on.
Next I got into the kit, and honestly, I am very impressed. The build quality of the wiring, the connectors, the ballasts, everything is top notch. I'll be honest I was ready to hammer on anything I found sub par (like as simple as the bulb casing), but I really like this kit. The ballast seems to be an all aluminum case, with a great finish. And when they say slim ballasts, they mean SLIM ballasts. I just used a basic ruler, so nothing crazy exact but they came in with Height a little over 8.5 inches, length at 7 inches and the width at a whopping 1 whole inch. These things can fit just about anywhere. I mentioned the wiring before, the wires from the ballasts are a cross weaved possibly nylon fabric along all the connectors. On the amp connector side is a similar site to the TRS connector setup. Not sure if this is a new standard in amp connectors, but it's very similar to one of the leaders in the HID business. On the OEM connector side we also have a good site. There is a box in the middle of the wiring with the words "smart" on them. Essentially go to my Original HID thread from TRS, and look at their canbus harness that plugs into their ballast. Let me know what you think. I am assuming, that inside that box will be your capacitors and resistors and other components that make the car happy when it comes to CANbus error free happy systems. A lot of ballasts will have them built into the ballast, some are done outside to make the ballasts smaller and easier to mount. And of course on the back of the ballast it shows CANBUS ballast. Which is what you want to see.
![]()
![]()
![]()
The .org only allows you to post so many pics per post. So I will continue this with future posts so my pics all show up.
Part 1
I will first off by stating this actually won't be going in my car. More of my friends dart due to me having stock D3S HIDs in my new dart. That doesn't mean I cannot keep a good eye on them after install, and be able to get tons of pics! So the package came in the mail today. Typical 2 day USPS shipping, which is amazing for companies. Try ordering from DDM Tuning (another HID company) and see how long your package takes. Considering it comes straight from China, literally. The packaging was great. I probably don't need to review these things, but if you've seen how some companies pack their crap (*cough* DDM *cough*) and considering that there are expensive electronics and fragile bulbs inside, its a good note to take.


Overall packing was fantastic. Only thing I could recommend differently is the casing around the bulbs. I noticed mine were loose/not around the bulb base entirely when I opened it. While the bulbs themselves are inside Styrofoam, I think something could be added to keep the plastic casing entirely on the bulb unless taken off by the customer. The locking fins on the base of the bulb do a okay job at holding it, but I have seen others also place like a Styrofoam ring around the base too to keep that casing entirely stuck on.
Next I got into the kit, and honestly, I am very impressed. The build quality of the wiring, the connectors, the ballasts, everything is top notch. I'll be honest I was ready to hammer on anything I found sub par (like as simple as the bulb casing), but I really like this kit. The ballast seems to be an all aluminum case, with a great finish. And when they say slim ballasts, they mean SLIM ballasts. I just used a basic ruler, so nothing crazy exact but they came in with Height a little over 8.5 inches, length at 7 inches and the width at a whopping 1 whole inch. These things can fit just about anywhere. I mentioned the wiring before, the wires from the ballasts are a cross weaved possibly nylon fabric along all the connectors. On the amp connector side is a similar site to the TRS connector setup. Not sure if this is a new standard in amp connectors, but it's very similar to one of the leaders in the HID business. On the OEM connector side we also have a good site. There is a box in the middle of the wiring with the words "smart" on them. Essentially go to my Original HID thread from TRS, and look at their canbus harness that plugs into their ballast. Let me know what you think. I am assuming, that inside that box will be your capacitors and resistors and other components that make the car happy when it comes to CANbus error free happy systems. A lot of ballasts will have them built into the ballast, some are done outside to make the ballasts smaller and easier to mount. And of course on the back of the ballast it shows CANBUS ballast. Which is what you want to see.


The .org only allows you to post so many pics per post. So I will continue this with future posts so my pics all show up.
Initial Review/Unboxing Xenon-Vision HIDs...
2 reading
Cntrollerfanboy
Discussion starter
4,828 posts
·
Joined 2013
- Add to quote Only show this user
LINK: http://www.xenonvisionhid.com/
Part 1
I will first off by stating this actually won't be going in my car. More of my friends dart due to me having stock D3S HIDs in my new dart. That doesn't mean I cannot keep a good eye on them after install, and be able to get tons of pics! So the package came in the mail today. Typical 2 day USPS shipping, which is amazing for companies. Try ordering from DDM Tuning (another HID company) and see how long your package takes. Considering it comes straight from China, literally. The packaging was great. I probably don't need to review these things, but if you've seen how some companies pack their crap (*cough* DDM *cough*) and considering that there are expensive electronics and fragile bulbs inside, its a good note to take.
Spoiler: Part 1 Wall of Pics
![]()
![]()
![]()
Overall packing was fantastic. Only thing I could recommend differently is the casing around the bulbs. I noticed mine were loose/not around the bulb base entirely when I opened it. While the bulbs themselves are inside Styrofoam, I think something could be added to keep the plastic casing entirely on the bulb unless taken off by the customer. The locking fins on the base of the bulb do a okay job at holding it, but I have seen others also place like a Styrofoam ring around the base too to keep that casing entirely stuck on.
Next I got into the kit, and honestly, I am very impressed. The build quality of the wiring, the connectors, the ballasts, everything is top notch. I'll be honest I was ready to hammer on anything I found sub par (like as simple as the bulb casing), but I really like this kit. The ballast seems to be an all aluminum case, with a great finish. And when they say slim ballasts, they mean SLIM ballasts. I just used a basic ruler, so nothing crazy exact but they came in with Height a little over 8.5 inches, length at 7 inches and the width at a whopping 1 whole inch. These things can fit just about anywhere. I mentioned the wiring before, the wires from the ballasts are a cross weaved possibly nylon fabric along all the connectors. On the amp connector side is a similar site to the TRS connector setup. Not sure if this is a new standard in amp connectors, but it's very similar to one of the leaders in the HID business. On the OEM connector side we also have a good site. There is a box in the middle of the wiring with the words "smart" on them. Essentially go to my Original HID thread from TRS, and look at their canbus harness that plugs into their ballast. Let me know what you think. I am assuming, that inside that box will be your capacitors and resistors and other components that make the car happy when it comes to CANbus error free happy systems. A lot of ballasts will have them built into the ballast, some are done outside to make the ballasts smaller and easier to mount. And of course on the back of the ballast it shows CANBUS ballast. Which is what you want to see.
![]()
![]()
![]()
The .org only allows you to post so many pics per post. So I will continue this with future posts so my pics all show up.
Part 1
I will first off by stating this actually won't be going in my car. More of my friends dart due to me having stock D3S HIDs in my new dart. That doesn't mean I cannot keep a good eye on them after install, and be able to get tons of pics! So the package came in the mail today. Typical 2 day USPS shipping, which is amazing for companies. Try ordering from DDM Tuning (another HID company) and see how long your package takes. Considering it comes straight from China, literally. The packaging was great. I probably don't need to review these things, but if you've seen how some companies pack their crap (*cough* DDM *cough*) and considering that there are expensive electronics and fragile bulbs inside, its a good note to take.
Overall packing was fantastic. Only thing I could recommend differently is the casing around the bulbs. I noticed mine were loose/not around the bulb base entirely when I opened it. While the bulbs themselves are inside Styrofoam, I think something could be added to keep the plastic casing entirely on the bulb unless taken off by the customer. The locking fins on the base of the bulb do a okay job at holding it, but I have seen others also place like a Styrofoam ring around the base too to keep that casing entirely stuck on.
Next I got into the kit, and honestly, I am very impressed. The build quality of the wiring, the connectors, the ballasts, everything is top notch. I'll be honest I was ready to hammer on anything I found sub par (like as simple as the bulb casing), but I really like this kit. The ballast seems to be an all aluminum case, with a great finish. And when they say slim ballasts, they mean SLIM ballasts. I just used a basic ruler, so nothing crazy exact but they came in with Height a little over 8.5 inches, length at 7 inches and the width at a whopping 1 whole inch. These things can fit just about anywhere. I mentioned the wiring before, the wires from the ballasts are a cross weaved possibly nylon fabric along all the connectors. On the amp connector side is a similar site to the TRS connector setup. Not sure if this is a new standard in amp connectors, but it's very similar to one of the leaders in the HID business. On the OEM connector side we also have a good site. There is a box in the middle of the wiring with the words "smart" on them. Essentially go to my Original HID thread from TRS, and look at their canbus harness that plugs into their ballast. Let me know what you think. I am assuming, that inside that box will be your capacitors and resistors and other components that make the car happy when it comes to CANbus error free happy systems. A lot of ballasts will have them built into the ballast, some are done outside to make the ballasts smaller and easier to mount. And of course on the back of the ballast it shows CANBUS ballast. Which is what you want to see.
The .org only allows you to post so many pics per post. So I will continue this with future posts so my pics all show up.
Cntrollerfanboy
Discussion starter
4,828 posts
·
Joined 2013
Part 2...
Spoiler: Wall of Pics 2
The rest of the unboxing I noticed they also gave some mounting brackets. Bolts or 3M tape if you prefer.
![]()
The cool thing I noticed, which was an idea of mine prior all this, they actually include a grounding wire for the mounting plate! I've always had a hunch that maybe the error message in the cold was due to the previous ballasts casing (typically aluminum or other metals) being the cause of issues when they get cold. I always thought to maybe ground the actual case, but there was never anywhere to mount it to. This is a pretty cool idea and I will test this with and without the plate and see how it goes.
![]()
The only downside to the bracket (which you don't need to use btw) is it was pretty rough machined metal. Which I can totally understand. Most companies charge extra for them typically, and it's not an essential or typically used part. I honestly have never used mounting brackets. I however will have the perfect spot for these, and will show that during my install portion. The way the bracket is designed makes it perfect for a simple easy place of mounting. No take or bolts needed! But for extra support I will probably use the tape too. Also I found that the bracket didn't hold the ballast all that well inside it. It holds, but I could see some spirited driving or bumps knock it loose if mounted in the vertical position. Which I won't be doing, but there are some other very good mounting spots on this car that are vertical if people want to take that route. My suggestion is that maybe another small 3M tape pad is provided to stick the ballast to the mount. My methods will actually involve putting the ballast in the reverse direction of the picture shown on the mount. I want to use the triangular portion to wedge into a slit inside the fender wells. Also I said the metal was kind of rough, and i mean just on the edges. Not like I cut my finger lightly handling it, but it did feel like a sharp edge almost all the way around. Just an observation.
And lastly the bulbs. Casing was already covered, but honestly looks like a TRS brand bulb. Similar high quality wire mesh, same braided nylon on the wires themselves. Bulb is branded as 9012 specific, so should fit our cars perfectly (2013-2015). 2016's use 9005 FYI for anything buying.
![]()
![]()
Last thing to do is install... coming soon to a .org near you.

The cool thing I noticed, which was an idea of mine prior all this, they actually include a grounding wire for the mounting plate! I've always had a hunch that maybe the error message in the cold was due to the previous ballasts casing (typically aluminum or other metals) being the cause of issues when they get cold. I always thought to maybe ground the actual case, but there was never anywhere to mount it to. This is a pretty cool idea and I will test this with and without the plate and see how it goes.

The only downside to the bracket (which you don't need to use btw) is it was pretty rough machined metal. Which I can totally understand. Most companies charge extra for them typically, and it's not an essential or typically used part. I honestly have never used mounting brackets. I however will have the perfect spot for these, and will show that during my install portion. The way the bracket is designed makes it perfect for a simple easy place of mounting. No take or bolts needed! But for extra support I will probably use the tape too. Also I found that the bracket didn't hold the ballast all that well inside it. It holds, but I could see some spirited driving or bumps knock it loose if mounted in the vertical position. Which I won't be doing, but there are some other very good mounting spots on this car that are vertical if people want to take that route. My suggestion is that maybe another small 3M tape pad is provided to stick the ballast to the mount. My methods will actually involve putting the ballast in the reverse direction of the picture shown on the mount. I want to use the triangular portion to wedge into a slit inside the fender wells. Also I said the metal was kind of rough, and i mean just on the edges. Not like I cut my finger lightly handling it, but it did feel like a sharp edge almost all the way around. Just an observation.
And lastly the bulbs. Casing was already covered, but honestly looks like a TRS brand bulb. Similar high quality wire mesh, same braided nylon on the wires themselves. Bulb is branded as 9012 specific, so should fit our cars perfectly (2013-2015). 2016's use 9005 FYI for anything buying.


Last thing to do is install... coming soon to a .org near you.
Cntrollerfanboy
Discussion starter
4,828 posts
·
Joined 2013
Part 3...
Install day was yesterday. I finally got everything in, and the verdict... Everything works great! Install was simple, and even with taking all the pictures for the install it probably only took me an hour of my time.
First pic October 22nd, 6:49pm. Last pic taken October 22nd, 7:29pm.")
Okay let's beggin...
Spoiler: Wall of Pics 3
I first started by taking a pic of the XK Glow 76W LED headlights that were originally in the test car. They were pretty good with not throwing errors, but light output in my opinion was, subpar. I did not happen to get a pic of the lights on the road, but it was not fully dark yet when I started the install.
![]()
Getting into the install, it first starts off with getting to the headlights. The next two pictures show where the you will need to get to in order to access the headlight.
Remove the access panel in the fender well
![]()
Remove the cap from the back of the headlight. It's a quarter left turn to remove. Once inside the stock bulb is in there, also give it a quarter turn to the left and take out the bulb, then disconnect the socket connected to it.
![]()
With the cap removed, you will need to drill a hole in cap to fit the wires through it. I stole these pics from my other HID thread. As I didn't have my drill tool to drill the holes. I am going to install the caps later today.
![]()
![]()
Once the light is removed and you have your new HID bulb ready inside the cap, then we can install it into the housing now. When installing, you almost have to go in blind. Unless you remove the tire, you cannot really see where you are going. Be very careful during this step. The bulb is obviously very fragile, along with the return wire on it. You don't want to break your bulb before it's even installed. By best suggestion is pop your head in there and get a feel where you are going. Maybe get some sort of light source and shine it directly into the headlight so you can easily see the hole that you need to put the bulb in. Once you understand that, the second hardest part is making sure you can lock the bulb in. The way the bulbs are designed, it's like an elbow. You want the base of the bulb (where the wires come out of) to be pointing almost directly to the right because you then want to turn it to the right for a quarter turn. The next two pics will show what the inside of the housing looks like, and what it looks like when the HID bulb is fully locked in.
![]()
![]()
Once the bulb is installed, you want to look for the bright blue male end of wire that comes with the bulb. This is the OEM input plug. You will take the socket that you removed from the stock light bulb, and insert it into this blue plug.
![]()
This is the OEM wire. Another important step is make sure the positive (green) wire goes to the blue wire of blue socket from the HID bulb. Plug clicks and locks into the socket, but the blue socket has locking tabs on both ends. So it can go both ways. Just keep it consistent starting here, and it will make your life a lot easier because when you plug it into the ballast, the ballast has a + and - on it you will need to match up. If it's backwards it simply won't turn on.
![]()
Install day was yesterday. I finally got everything in, and the verdict... Everything works great! Install was simple, and even with taking all the pictures for the install it probably only took me an hour of my time.
First pic October 22nd, 6:49pm. Last pic taken October 22nd, 7:29pm.
Okay let's beggin...
I first started by taking a pic of the XK Glow 76W LED headlights that were originally in the test car. They were pretty good with not throwing errors, but light output in my opinion was, subpar. I did not happen to get a pic of the lights on the road, but it was not fully dark yet when I started the install.

Getting into the install, it first starts off with getting to the headlights. The next two pictures show where the you will need to get to in order to access the headlight.
Remove the access panel in the fender well

Remove the cap from the back of the headlight. It's a quarter left turn to remove. Once inside the stock bulb is in there, also give it a quarter turn to the left and take out the bulb, then disconnect the socket connected to it.

With the cap removed, you will need to drill a hole in cap to fit the wires through it. I stole these pics from my other HID thread. As I didn't have my drill tool to drill the holes. I am going to install the caps later today.


Once the light is removed and you have your new HID bulb ready inside the cap, then we can install it into the housing now. When installing, you almost have to go in blind. Unless you remove the tire, you cannot really see where you are going. Be very careful during this step. The bulb is obviously very fragile, along with the return wire on it. You don't want to break your bulb before it's even installed. By best suggestion is pop your head in there and get a feel where you are going. Maybe get some sort of light source and shine it directly into the headlight so you can easily see the hole that you need to put the bulb in. Once you understand that, the second hardest part is making sure you can lock the bulb in. The way the bulbs are designed, it's like an elbow. You want the base of the bulb (where the wires come out of) to be pointing almost directly to the right because you then want to turn it to the right for a quarter turn. The next two pics will show what the inside of the housing looks like, and what it looks like when the HID bulb is fully locked in.


Once the bulb is installed, you want to look for the bright blue male end of wire that comes with the bulb. This is the OEM input plug. You will take the socket that you removed from the stock light bulb, and insert it into this blue plug.

This is the OEM wire. Another important step is make sure the positive (green) wire goes to the blue wire of blue socket from the HID bulb. Plug clicks and locks into the socket, but the blue socket has locking tabs on both ends. So it can go both ways. Just keep it consistent starting here, and it will make your life a lot easier because when you plug it into the ballast, the ballast has a + and - on it you will need to match up. If it's backwards it simply won't turn on.

Cntrollerfanboy
Discussion starter
4,828 posts
·
Joined 2013
Part 4...
Spoiler: Wall of Pics 4
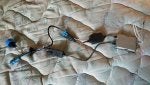
Now to get to the ballast installation. I took a pic of what the entire system will look like (on one side).
In the pic the ballast has one female end socket, and then it has two small AMP connectors. Going back to the post above with the bulb installation, you have a male end side of the plug that the OEM plug went into, then you have the same two AMP connectors. I think you can see where this is going. Those go to each other!
![]()
My personal chose of ballast location is here. It's a slit in the engine bay fenders, and if you use the provided mounting brackets, you can slide the triangular end into this slit and it's going to stay put. I forgot to take a picture of the ground wire for the mounting bracket. This may not even be necessary but I did it anyways. If you put the ballasts here, you will see the L shaped bracket that is right above the ballast. There is a nice 10mm bolt through that bracket, simply remove that bolt, and put the ground there. I have used that bolt for many grounds before and is a very good one. You can even see it in the pictures below.
![]()
![]()
Once your ballasts are in place, you want the route the wires down to where your bulbs are. If you're stock the only issue you might run into is the air box. If you have a CAI then this will not be an issue. I was able to fit the big block AMP connectors down there by removing the coolant hose out of it's little hook and then pushed all the wires down there, then replaced the coolant hose into it's loop. On the driver side, just pass it down behind the battery. The cool thing I didn't know is that there are LEDs inside the ballast connector that show that they are receiving power. This is a cool feature, and will help in trouble shooting if something is not working. If your ballast gets power but your light is not on, then the issue is your bulb. This would have been VERY helpful to me earlier in the day. I was helping my friend with his HIDs on his 200. 3/4 of his lights did not work. One was just a bulb, the other two was a ballast was shorting out and causing the relay fuse to blow, killing both lights. But back to the topic at hand...
![]()
I took a pic comparing the new HIDs (right) and previous LEDs (left). What you can notice is the HID has a very intense "hot spot" right in the center. If you look at stock lights up against a wall you notice the same thing. This is the DISTANCE of light output. Seeing further out, and directly in front of you is the main point of light that you want out of the headlights. Adding HIDs (or high powered LEDs which is actually what I use) to the fog lights will give you that outside light as well. So for overall best lighting, upgrading both headlights and fogs (if you have them) are your best bet. The LEDs did a good job, but I just felt the light didn't go as far and was bright up to a point and then just abruptly stopped.
![]()
Last three pics are with both HIDs (only headlights on) on the garage and on the road. Low beam, then high beam on the road.
![]()
![]()
![]()
In the pic the ballast has one female end socket, and then it has two small AMP connectors. Going back to the post above with the bulb installation, you have a male end side of the plug that the OEM plug went into, then you have the same two AMP connectors. I think you can see where this is going. Those go to each other!

My personal chose of ballast location is here. It's a slit in the engine bay fenders, and if you use the provided mounting brackets, you can slide the triangular end into this slit and it's going to stay put. I forgot to take a picture of the ground wire for the mounting bracket. This may not even be necessary but I did it anyways. If you put the ballasts here, you will see the L shaped bracket that is right above the ballast. There is a nice 10mm bolt through that bracket, simply remove that bolt, and put the ground there. I have used that bolt for many grounds before and is a very good one. You can even see it in the pictures below.


Once your ballasts are in place, you want the route the wires down to where your bulbs are. If you're stock the only issue you might run into is the air box. If you have a CAI then this will not be an issue. I was able to fit the big block AMP connectors down there by removing the coolant hose out of it's little hook and then pushed all the wires down there, then replaced the coolant hose into it's loop. On the driver side, just pass it down behind the battery. The cool thing I didn't know is that there are LEDs inside the ballast connector that show that they are receiving power. This is a cool feature, and will help in trouble shooting if something is not working. If your ballast gets power but your light is not on, then the issue is your bulb. This would have been VERY helpful to me earlier in the day. I was helping my friend with his HIDs on his 200. 3/4 of his lights did not work. One was just a bulb, the other two was a ballast was shorting out and causing the relay fuse to blow, killing both lights. But back to the topic at hand...

I took a pic comparing the new HIDs (right) and previous LEDs (left). What you can notice is the HID has a very intense "hot spot" right in the center. If you look at stock lights up against a wall you notice the same thing. This is the DISTANCE of light output. Seeing further out, and directly in front of you is the main point of light that you want out of the headlights. Adding HIDs (or high powered LEDs which is actually what I use) to the fog lights will give you that outside light as well. So for overall best lighting, upgrading both headlights and fogs (if you have them) are your best bet. The LEDs did a good job, but I just felt the light didn't go as far and was bright up to a point and then just abruptly stopped.

Last three pics are with both HIDs (only headlights on) on the garage and on the road. Low beam, then high beam on the road.


Cntrollerfanboy
Discussion starter
4,828 posts
·
Joined 2013
Part 5
Everything is updated. I would really like to thank @Xenon-Vision for letting me try these out. I will be honest, I was very skeptical when they showed up. But after getting my hands on these, and trying them out I am more than impressed. It hasn't gotten to below freezing temps yet, but overall I would have to say these matched if not superior quality to my initial go to HID source, theretrofitsource. I will further update with any issues that might come up
Everything is updated. I would really like to thank @Xenon-Vision for letting me try these out. I will be honest, I was very skeptical when they showed up. But after getting my hands on these, and trying them out I am more than impressed. It hasn't gotten to below freezing temps yet, but overall I would have to say these matched if not superior quality to my initial go to HID source, theretrofitsource. I will further update with any issues that might come up
733 posts
·
Joined 2014
Looking for the install part. I'm not a fan of aftermarket HID install which is often a pain in the *** and didn't do mine so far but if the kit is an easy install and error free I might do it.
685 posts
·
Joined 2014
Very interesting because Ohio is cold and most of the time issue came with colder temperature.
1,177 posts
·
Joined 2014
looking forward to the results.
will most likely make the switch if they go error free in the cold.
will most likely make the switch if they go error free in the cold.
47 posts
·
Joined 2016
We are hoping so. If not we will get to the bottom of fixing the issue.
Thank you!!Looks legit!
We are patiently waiting. We are very happy with what you have posted already. Thanks again and now we are awaiting for the next parts.Still getting around to install. Don't worry @Xenon-Vision I will get the rest of the review up very soon! Just with tests on the horizon, and my fathers birthday this weekend, I haven't had a lot of time to do much.
Cntrollerfanboy
Discussion starter
4,828 posts
·
Joined 2013
Still getting around to install. Don't worry @Xenon-Vision I will get the rest of the review up very soon! Just with tests on the horizon, and my fathers birthday this weekend, I haven't had a lot of time to do much.
649 posts
·
Joined 2015
@Cntrollerfanboy, So I missed the part where you tell me what kit you installed and how much the kit cost. I know it's @Xenon-Vision, but what are the specifics. please?
1,177 posts
·
Joined 2014
anxious to see the results of the cold weather.
mine have been going off every morning for about month now.
mine have been going off every morning for about month now.
30 posts
·
Joined 2016
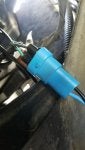
So I got these as a christmas gift and now getting around to installing them, taking advantage of the nice weather. However I'm having problems. They aren't receiving power. Any idea what's going on? This is now day 3 of troubleshooting. I'll post pics of the connections. Hopefully it's just some serious user error. These are for a 2016 Dart SXT. 9005 bulb and they are Canbus. I don't have any blown fuses or anything because my stock lights still work perfectly fine.
I've been using this thread as a guide. Everything seems to be identical.
![]()
I've switched this around several times.
![]()
LED light now showing any power going to it.
![]()
It's grounded on the L bracket. There's no paint or anything around the blot or on the bolt.
![]()
I've been using this thread as a guide. Everything seems to be identical.
I've switched this around several times.
LED light now showing any power going to it.
It's grounded on the L bracket. There's no paint or anything around the blot or on the bolt.

47 posts
·
Joined 2016
@Cntrollerfanboy I need you assistance. I would only think it can be the reverse polarity but from the post that @ReptarOnIce posted it looks good to me. I hope its not our product thats defective but I will gladly send him another setup to try if thats the case.So I got these as a christmas gift and now getting around to installing them, taking advantage of the nice weather. However I'm having problems. They aren't receiving power. Any idea what's going on? This is now day 3 of troubleshooting. I'll post pics of the connections. Hopefully it's just some serious user error. These are for a 2016 Dart SXT. 9005 bulb and they are Canbus. I don't have any blown fuses or anything because my stock lights still work perfectly fine.
I've been using this thread as a guide. Everything seems to be identical.
View attachment 84865
I've switched this around several times.
View attachment 84873
LED light now showing any power going to it.
View attachment 84881
It's grounded on the L bracket. There's no paint or anything around the blot or on the bolt.
View attachment 84889
402 posts
·
Joined 2016
@Cntrollerfanboy
So the xenon vs stock HID you thought the stock HID's were better?
I'll have to take a pic of down the road and by garage. I love my HIDs that came with the dart. But the pair I had on my truck were significantly brighter.... Plus I like the 6k color better.. can't beat it for $79.99
So the xenon vs stock HID you thought the stock HID's were better?
I'll have to take a pic of down the road and by garage. I love my HIDs that came with the dart. But the pair I had on my truck were significantly brighter.... Plus I like the 6k color better.. can't beat it for $79.99
23 posts
·
Joined 2014
nice write up! so how is the cold weather performance on these now that winter is almost over?
1,177 posts
·
Joined 2014
Maybe I have missed it, but has anyone had these in cold weather to determine if they trigger the low beam out message?
47 posts
·
Joined 2016
View attachment 84873
Switch this one so the little tab goes into the clip.
View attachment 84881
Switch this one on one side only. Not the other side so one is clipped one way and the other is not.
If you have already done that, next thing is to remove the black and blue wire from the first picture above. you can touch it with the battery black - negative and blue - positive directly to the battery source to see if it fires up. Also from the first pic the factory power cable does look smaller than usual, is there another plug? Let me know if that works out.
30 posts
·
Joined 2016
I'll try this tomorrow. As for the factory plug, that's the only one that I could see. It's the one that was plugged into the stock bulb. Might look smaller because of the angle.
Thanks for all the help so far in troubleshooting this. You've all been great.
Thanks for all the help so far in troubleshooting this. You've all been great.
30 posts
·
Joined 2016
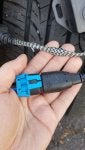
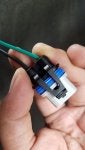
@Xenon-Vision Okay so. I believe I may have found the problem I've been having. I received two new sets to try out the other day and both of those had failed too, but then I started looking at everything more closely.
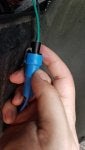
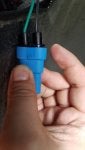
The stock connector for the 2016 Darts (At least for me) do not fit perfectly into the HID connector. There's no *click* sound to let you know it's in place and you can pull it off pretty easy without any effort. As soon as I can find something to shave down the blue connector, I'm hoping this will solve all my problems. It's like this for both sides and no matter how much I press down to try to get it to click in place, it won't move. So I'm just assuming the HID connector is too tall for this years vehicle.
![]()
![]()
![]()
![]()
The stock connector for the 2016 Darts (At least for me) do not fit perfectly into the HID connector. There's no *click* sound to let you know it's in place and you can pull it off pretty easy without any effort. As soon as I can find something to shave down the blue connector, I'm hoping this will solve all my problems. It's like this for both sides and no matter how much I press down to try to get it to click in place, it won't move. So I'm just assuming the HID connector is too tall for this years vehicle.

27 posts
·
Joined 2016
did shaving it down work for you? I'm having the same no power problem on my 16. Doesn't seat fully on mine either@Xenon-Vision Okay so. I believe I may have found the problem I've been having. I received two new sets to try out the other day and both of those had failed too, but then I started looking at everything more closely.
The stock connector for the 2016 Darts (At least for me) do not fit perfectly into the HID connector. There's no *click* sound to let you know it's in place and you can pull it off pretty easy without any effort. As soon as I can find something to shave down the blue connector, I'm hoping this will solve all my problems. It's like this for both sides and no matter how much I press down to try to get it to click in place, it won't move. So I'm just assuming the HID connector is too tall for this years vehicle.
View attachment 86297
View attachment 86281
View attachment 86289
View attachment 86305
32 posts
·
Joined 2013
Quick question for cntrollerfanboy.
Are you able to leave your headlight "auto on" function.. on, or do you need to run them manually with the HID kit ( as their site recommends)?
Ken
Are you able to leave your headlight "auto on" function.. on, or do you need to run them manually with the HID kit ( as their site recommends)?
Ken
1,045 posts
·
Joined 2014
You can leave the switch in the auto on if you like and the lights will function. Typically people don't recommend this because sometimes it will turn on when going in a tunnel and then then off after. It is hard on the system with quick ons and off.
77 posts
·
Joined 2016
I have a 2016, and am in LA (unfortunately only until sunday morning). How long would you need the car for?
30 posts
·
Joined 2016
UPDATE:
I got the lights working fine. The issue was the 9005 connector. I'd like to thank you guys for the help and shout out to Will from Xenon Vision for everything and for sending the special connectors quickly. Looking forward to actually seeing how these things are at night.
I got the lights working fine. The issue was the 9005 connector. I'd like to thank you guys for the help and shout out to Will from Xenon Vision for everything and for sending the special connectors quickly. Looking forward to actually seeing how these things are at night.
16 posts
·
Joined 2016
So, I need some troubleshooting help. @Xenon-Vision
I ordered a kit for my 2015 Dart last week and got the install done over the weekend. It worked great the first night. Then the second night the left side wouldn't light and I got a bulb out warning. The next morning they both worked fine, but again that night the left side wouldn't fire. So, I swapped the ballasts from left to right and they both worked that night. This morning they both worked, but I sat parked in the car with it idling waiting on a friend and after about 10-15 minutes I got the bulb out error on the left side again.
Since I swapped ballasts, could it be the bulb on the left side? Or is there something else going on? When I get the bulb out error and check the power LED on the plug for the ballast it is not lit, but I'm assuming that's because the car stops sending power to the light when it decides that it's out. Am I wrong on that?
Cntrollerfanboy
Discussion starter
4,828 posts
·
Joined 2013
No the car will show the error but does not stop sending power. Something seems to be off with the left side. Have you tried swapping the bulbs as well? I think that should be the last step to isolate the issue to this. Because if you do that, and then the left side still does not fire, then it has to be something else. Then all of the left components are on the right and working properly, and all the right components that were on the right (and working) are on the left and now having issues. At that point it might even be an issue with the connector or wiring causing it to drop the power.
402 posts
·
Joined 2016
Has anyone installed these in a factory HID bezel?
Going to buy 5000k fogs, and I don't want them to be brighter/bluer than the OEM 4300k headlights... and I don't want to loose the spread I have with my OEM
Going to buy 5000k fogs, and I don't want them to be brighter/bluer than the OEM 4300k headlights... and I don't want to loose the spread I have with my OEM
Cntrollerfanboy
Discussion starter
4,828 posts
·
Joined 2013
I ended up buying the D3S HID bulbs from TheRetrofitSource for my car, because it too is stock HIDs. I got the 5500k and it's a a perfect cool white look. Personally my taste and look, but not everyone. I disliked the stock 4300k. Too yellow at different angles and didn't match my LED turn signals very well. Here is the link if that interests you or you ever need to replace yours HERE
I got these as 6000k I think, and they do have a hint of blue and not over powering. I think the 4300k should work well for your application.
I am a lighting guy. Being an engineer, the electronics amuse me, and this car has been a nightmare for solving simple electronic issues. Like adding LEDs, etc. It was my skill set and interest in this field that helped push me to figure this stuff out and help others.
I got these as 6000k I think, and they do have a hint of blue and not over powering. I think the 4300k should work well for your application.
Not a problem! There is a small * looking button on the bottom left corner of each post. That is for our reputation system. If you see anything that really helps you and or the community out, that is what that button is for!Gotta say Cntrollerfanboy... Thank you very much for the very detailed information regarding mostly lighting (in my case). I just recently purchased these. I searched all over for LED upgrading for my Dart and nearly everything I found you were at the forefront of knowledge (and error message fixes!), just wanted to drop by and say thank you! Also thank you to Xenon Vision for the wonderful support, can't wait to install my 5000k HID's!
I am a lighting guy. Being an engineer, the electronics amuse me, and this car has been a nightmare for solving simple electronic issues. Like adding LEDs, etc. It was my skill set and interest in this field that helped push me to figure this stuff out and help others.
11 posts
·
Joined 2016
Gotta say Cntrollerfanboy... Thank you very much for the very detailed information regarding mostly lighting (in my case). I just recently purchased these. I searched all over for LED upgrading for my Dart and nearly everything I found you were at the forefront of knowledge (and error message fixes!), just wanted to drop by and say thank you! Also thank you to Xenon Vision for the wonderful support, can't wait to install my 5000k HID's!
47 posts
·
Joined 2016
@Cntrollerfanboy is the MAN! Also I am not the forums as much anymore due to a change in company direction. Please email us at sales@xenonvisionhid.com with any problems. Also the code for dart members we are leaving active for as long as possible! Thank you all again for your business!
-
?
-
?
-
?
-
?
-
?
-
?
-
?
-
?
-
?
-
?
-
?
-
?
-
?
-
?
-
?
-
?
-
?
-
?
-
?
-
?
- posts
- 533K
- members
- 34K
- Since
- 2012
Dodge-Dart.org is a forum dedicated to the 2013-2016 Dodge Dart. Join and participate in discussions about maintenance, performance mods, and mechanical issues. Get the latest tips, news, browse the classifieds, and more!


